With the AWS Multi-Account Control Tower model and AWS
Identity Center as your identity provider, you can connect to a CodeCommit
repository in one of the child accounts using the AWS CLI and Identity Centre
Credentials. Ensure that the appropriate permissions are granted to your
Identity Center IDs to access CodeCommit in the corresponding account.
Prerequisite
- AWS CLI above version 2
- Python version3 with pip.
- Git Client latest version.
- Create the user and provide “AWSCodeCommitAccess” role access to the user.
- Sign out and close all AWS consoles.
- Install git-remote-codecommit plugin & ensure the PATH variable is correctly set.
Installing git-remote-codecommit plugin
On
a computer running Linux, macOS, or Unix:
$sudo pip install git-remote-codecommit
On a computer running Windows:
$pip
install --user git-remote-codecommit
Note:- Account numbers mentioned in this blog post is not a valid account number and is used for demo purpose only.
Step1 – Configure Identity Centre for AWS CLI
Open your command prompt, type below command and input provided values.
$ aws configure sso
SSO session name (Recommended): aws-codecommit-session
(Enter a name for the session)
SSO start URL [None]: https://XXXXXX.awsapps.com/start/
(Enter Identity Centre URL)
SSO region [None]: us-east-1
(Enter the AWS Region)
SSO registration scopes [sso:account:access]: 0123456789123
(Enter the Identity Centre Account ID)
<Command Prompt Message>
Attempting to automatically open the SSO authorization page in your default browser.
If the browser does not open or you wish to use a different device to authorize this request, open the following URL:
https://device.sso.ap-south-1.amazonaws.com/
Then enter the code:
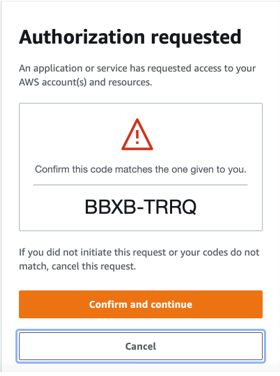
BBXB-TRRQ
Step2- Confirm
the authorization code.
Once you entered above values, you
will be redirected to below page. Note down the authorization code in the web
page and ensure that you have same code in your command prompt as well.
After successful verification, click
on “Confirm and Continue” (Don’t proceed
if the authorization code verification is not successful.)
Step3- Allow authorization request.
After successful confirmation you will be redirected to below page.
Click on “Allow”
You will be notified with the approval status.
Step4- AWS CLI
Profile details.
Switch back to command prompt and note down the profile name.
The only AWS account
available to you is: 987654321012
Using the account ID 987654321012
The only role
available to you is: AWSCodeCommitAccess
Using the role name
"AWSCodeCommitAccess"
CLI default client
Region [us-east-1]:<Enter>
CLI default output
format [None]:<Enter>
CLI profile name
[AWSCodeCommitAccess-987654321012]:<Enter>
(If you would like to change the profile name you can enter the new profile name here but you should use the same profile name while executing below command)
Step5- Clone your repository.
Use below command to clone your repository.
$ git clone codecommit::us-east-1://AWSCodeCommitAccess-987654321012@<Repository Name>
Example:
$ git clone codecommit::us-east-1://AWSCodeCommitAccess-987654321012@test-repository


No comments:
Post a Comment