A Sneak Peak into AWS Control Tower.


AWS Control Tower 

AWS Control Tower is a service provided by Amazon Web Services (AWS) that helps organizations set up and govern a secure, multi-account AWS environment based on AWS best practices AWS Control Tower orchestrates the capabilities of several other AWS services, including AWS Organizations, AWS Service Catalog, and AWS IAM Identity Center, to build a landing zone, which helps organizations adhere to best practices for security and compliance.

 Key Features

         Landing Zone Setup:

      • Automated Environment: Set up a pre-configured, secure, multi-account AWS environment.
      • Multi-Account Management: Enables the creation and management of multiple AWS accounts using AWS Organizations.
         Governance and Compliance:

      • Guardrails: Implement pre-packaged governance rules (guardrails) to enforce policies. These include preventive (blocking actions) and detective (identifying actions) controls.
      • Service Control Policies (SCPs): Apply permissions management across accounts to enforce compliance.
         Account Provisioning:

      • Account Factory: Streamlines the provisioning of new AWS accounts with standardized configurations.
        Centralized Logging and Monitoring:

      • AWS CloudTrail Integration: Logs all API activity across your AWS environment.
      • AWS Config Integration: Tracks resource configurations and changes to ensure compliance.
         Single Sign-On (SSO):

      • AWS SSO Integration: Provides single sign-on access to AWS accounts and applications.
Benefits

        Simplified Setup and Management:

      • Reduces the complexity and time required to establish a multi-account AWS environment following best practices.
        Enhanced Security and Compliance:

      • Enforces security policies and compliance through automated guardrails and SCPs.
        Operational Efficiency:

      • Automates setup and governance, allowing IT teams to focus on higher-value tasks.
        Scalability:

      • Facilitates the easy scaling of cloud environments, allowing quick provisioning of new accounts with consistent configurations.
        Cost Management:

      • Provides visibility and governance over resources, aiding in cost optimization.
Control Tower Dashboard

The AWS Control Tower console provides a centralized interface to monitor and manage your multi-account AWS environment.

The dashboard provides you the status of Landing Zone.


You will be able to view the environment summary like number of OU and Accounts.


Dashboard provides you the details of enabled controls

The dashboard lists non-compliant resources.


The dashboard also provides information about the compliance status and the registration status of OU/Accounts.  


In addition, the AWS Control Tower console serves as the central hub for managing and overseeing your AWS Control Tower environment.


Connecting to a CodeCommit repository from AWS CLI using Identity Centre Credentials.


With the AWS Multi-Account Control Tower model and AWS Identity Center as your identity provider, you can connect to a CodeCommit repository in one of the child accounts using the AWS CLI and Identity Centre Credentials. Ensure that the appropriate permissions are granted to your Identity Center IDs to access CodeCommit in the corresponding account.

Prerequisite

  • AWS CLI above version 2
       Installation Steps

  • Python version3 with pip.
  • Git Client latest version.
  • Create the user and provide “AWSCodeCommitAccess” role access to the user.
  • Sign out and close all AWS consoles.
  • Install git-remote-codecommit plugin & ensure the PATH variable is correctly set.

Installing git-remote-codecommit plugin

On a computer running Linux, macOS, or Unix:

$sudo pip install git-remote-codecommit

On a computer running Windows:

$pip install --user git-remote-codecommit

Note:- Account numbers mentioned in this blog post is not a valid account number and is used for demo purpose only.

Step1 – Configure Identity Centre for AWS CLI

Open your command prompt, type below command and input provided values.

$ aws configure sso

SSO session name (Recommended): aws-codecommit-session
(Enter a name for the session)

SSO start URL [None]: https://XXXXXX.awsapps.com/start/
(Enter Identity Centre URL)

SSO region [None]: us-east-1

(Enter the AWS Region)

SSO registration scopes [sso:account:access]: 0123456789123

(Enter the Identity Centre Account ID)

<Command Prompt Message>

Attempting to automatically open the SSO authorization page in your default browser.

If the browser does not open or you wish to use a different device to authorize this request, open the following URL:

 https://device.sso.ap-south-1.amazonaws.com/

 Then enter the code:

 BBXB-TRRQ

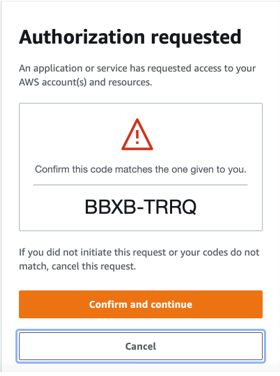
Step2- Confirm the authorization code.

Once you entered above values, you will be redirected to below page. Note down the authorization code in the web page and ensure that you have same code in your command prompt as well.

After successful verification, click on “Confirm and Continue”  (Don’t proceed if the authorization code verification is not successful.)


Step3- Allow authorization request.

After successful confirmation you will be redirected to below page.

Click on “Allow”


You will be notified with the approval status.


Step4- AWS CLI Profile details.


Switch back to command prompt and note down the profile name.

The only AWS account available to you is: 987654321012 

Using the account ID 987654321012

The only role available to you is: AWSCodeCommitAccess

Using the role name "AWSCodeCommitAccess"

CLI default client Region [us-east-1]:<Enter>

CLI default output format [None]:<Enter>

CLI profile name [AWSCodeCommitAccess-987654321012]:<Enter>

(If you would like to change the profile name you can enter the new profile name here but you should use the same profile name while executing below command)

 Step5- Clone your repository.

 Use below command to clone your repository.

 $ git clone codecommit::us-east-1://AWSCodeCommitAccess-987654321012@<Repository Name>

 Example:

$ git clone codecommit::us-east-1://AWSCodeCommitAccess-987654321012@test-repository


Playing with docker Volumes


Data generated or used by containers are not preserved beyond the life of containers. Volumes are one the of preferred way for persisting these data. 

Let us first check the behavior of a container..

Start an nginx container with below docker command.

 # docker run -p 80:80 nginx

 
/docker-entrypoint.sh: /docker-entrypoint.d/ is not empty, will attempt to perform configuration
/docker-entrypoint.sh: Looking for shell scripts in /docker-entrypoint.d/
/docker-entrypoint.sh: Launching /docker-entrypoint.d/10-listen-on-ipv6-by-default.sh
10-listen-on-ipv6-by-default.sh: Getting the checksum of /etc/nginx/conf.d/default.conf
10-listen-on-ipv6-by-default.sh: Enabled listen on IPv6 in /etc/nginx/conf.d/default.conf
/docker-entrypoint.sh: Launching /docker-entrypoint.d/20-envsubst-on-templates.sh
/docker-entrypoint.sh: Configuration complete; ready for start up

Access the default page


You will get above page. 

Stop above container and get inside the container by using below command.

# docker run -it nginx /bin/sh
# hostname
7b3fb00899b3

Navigate to the nginx document root. You will see the index page.

# cd /usr/share/nginx/html
# ls -ltr
total 8
-rw-r--r--. 4 root root 612 Aug 11 14:50 index.html
-rw-r--r--. 4 root root 494 Aug 11 14:50 50x.html

Rename or remove the index.html file and create a new file with your content.

# mv index.html index.html.backup

# echo "This is a test index file" > index.html

# ls -ltr
total 12
-rw-r--r--. 1 root root 612 Aug 11 14:50 index.html.backup
-rw-r--r--. 4 root root 494 Aug 11 14:50 50x.html
-rw-r--r--. 1 root root  26 Sep 23 15:53 index.html
#

Here you are ready with your new index.html file.

These changes will be lost if you delete the container.


Now let us see how can we make our changes persistent with volumes.

Create a volume

# docker volume create myvol

Inspect the volume.

# docker volume inspect myvol
[
    {
        "Driver": "local",
        "Labels": {},
        "Mountpoint": "/var/lib/docker/volumes/myvol/_data",
        "Name": "myvol",
        "Options": {},
        "Scope": "local"
    }
]

You can see the mountpoint.

go to the mountpoint and create an index file.

# cd /var/lib/docker/volumes/myvol/_data

created an index file with below content

# cat index.html
This is my test html file

issue below docker command to run the nginx container

# docker run -p 80:80 -v myvol:/usr/share/nginx/html nginx


/docker-entrypoint.sh: /docker-entrypoint.d/ is not empty, will attempt to perform configuration
/docker-entrypoint.sh: Looking for shell scripts in /docker-entrypoint.d/
/docker-entrypoint.sh: Launching /docker-entrypoint.d/10-listen-on-ipv6-by-default.sh
10-listen-on-ipv6-by-default.sh: Getting the checksum of /etc/nginx/conf.d/default.conf
10-listen-on-ipv6-by-default.sh: Enabled listen on IPv6 in /etc/nginx/conf.d/default.conf
/docker-entrypoint.sh: Launching /docker-entrypoint.d/20-envsubst-on-templates.sh
/docker-entrypoint.sh: Configuration complete; ready for start up

Try accessing the page again, you will get your new index.html


If you start the container without -v switch you will again get the nginx default page.


Google Cloud Platform VPC - Part1

       A Virtual Private Cloud is an isolated or private space with in the cloud platform. Unlike other cloud providers Google Cloud Platform VPC is global resource and it can span across multiple regions. Google has done massive investment to build its own network infrastructure. Google has its own high bandwidth submarine fiber optic networks connecting across the globe.

Below figures is a very high level architecture of Google Cloud Platform VPC.


1.) Google Cloud Platform VPC can span across multiple regions.
2.) A subnet is a regional resource and it cannot span regions.
3.) Subnet can span across zones.
4.) A subnet IP space can be expanded without any shutdown or downtime.